
So you want to start a b2b podcast. Great!
It’s super easy to start a podcast.
Lol, if only.
There’s a lot you have to think about if you want to start a podcast:
- Your “why”
- Equipment
- Technology
- Editing
- Distribution
Yeah, it’s a lot.
So if you’re not 100% sold on starting a podcast, then I’d recommend you read my colleague Tara’s article first — she’s our illustrious host of Demand Gen Chat and explains the pros and cons of starting a podcast.
But if you ARE sold on starting a b2b podcast, then this is the article for you.
I’m going to explain everything you need to know about how to launch a b2b podcast!
Let’s dive in.
Step 1: Find your why
The first question you want to ask yourself is: Why does the world need another podcast?
I’m not trying to discourage you.
It’s not wrong that you want to start a podcast, but you need to think about why. How are you going to differentiate yourself?
So many people just record themselves talking and call it a podcast.
Spoiler: That’s not an effective podcasting strategy.
If you’re not sure how to get started, here are some tips:
- Conduct a competitive analysis of other podcasts in your space. Include things like topics covered, show format, show type, host type, etc. (here’s a template you can use to get started)
- Think about yourself. What is unique about you either based on your experiences, career, or role now?
- Do you have strong opinions that are counter-cultural or maybe perspective not a lot of others share?
- What topics or ideas do naturally enjoy talking about with others?
- Is there a target audience for that topic or point of view?
And here’s my final key tip for success:
"1,000 true fans are far more powerful than a million regular fans.”
-Kevin Kelly
That absolutely applies to the success of starting a podcast, in a saturated library of podcast content you’ll stand out through differentiation.
So when you’re creating your podcast’s topic/theme/pov don’t create content for the masses, instead, create more niche content for a target audience of like-minded people.
This not only will help you reach the right people but will also build a strong foundation for creating a loyal community of listeners for your podcast.
Step 2: Decide on a podcast style and format
Now it’s time to decide on a show structure. You can’t just hit record, have a conversation, and expect the world to care. (Sorry)
Here are some common formats you might want to consider:
Interview-Style
An interview-style podcast is… well, interview-based.
Successful interview-style podcasts invite smart people to the podcast and ask them questions.
The mistake a lot of podcast hosts make with interview-style podcasts is kind of just “winging it” with each guest.
Instead, you should do extensive research, and I mean like borderline stalker research, the more you can base the discussion on specific and factual details about your guest the better.
A great example of this is Hot Ones, which is an interview-based show that has a really unique approach with incredibly well-researched questions and discussion points.
Check out this example below with Sean Evans, the host of Hot Ones, being complimented on his interview questions and a quick breakdown on how you can do the same...
Here are some examples of interview-style podcasts:
- Demand Gen Chat
- Demand Gen U
- Hot Ones
- Content Logistics
- Owned by AudiencePlus
- The Customer Engagement Lab
- The Marketing Millennials
- Revenue Vitals
- Stuff You Should Know
What are the benefits of an interview-style podcast?
Great question, thanks for asking.
The main benefits of an interview-style podcast are:
- Humans relate in conversation
And interview-formatted podcasts allow you to curate those interesting conversations on behalf of your audience.
- Guest research
Like I mentioned before, you have the opportunity to extensively research your guests before the interview. That way you can have a discussion that gets real deep.
- Differing opinions
Your guests can offer contrasting opinions to your own on topics which create dynamic and engaging conversations
The episodes are built more on the guest and less on the host but note, this doesn't mean as a host you’re off the hook!
A great host in an interview format dynamically listens throughout the conversation to know when to interrupt ((politely)) and when to dig deeper when the conversation takes an unexpected turn. As an interview host, you’re not there to consume, you’re there to curate. More on this later.
Journalistic Style
A journalistic style is about choosing a topic and guiding the audience through a journey. You’ll weave interviews together with a voiceover to create a story that captures your audience.
If you can do it right, a journalistic style is quite effective — because it’s essentially pure storytelling from start to finish. And if there’s one thing I know about people, we love a good story.
Here are some examples of journalistic-style podcasts:
Solo-style
A solo podcast is just one person explaining their take on something. It could be informational, could be educational, could be philosophical.
Solo-style podcasts are less common, but they can still be an effective podcasting format. You might consider a diary-style if you have a more complex topic to talk about and want to focus on the structure and delivery of the information to your audience. These types of podcasts are also often a bit shorter than other formats but are more concise and to the point.
Podcast formats: Video, Audio, In-Person, Oh My!
As you’re thinking about which podcasting style you want, you’ll also want to think about the format you want.
Here are a few common format options:
Audio-only
The benefit of audio-only is it’s a lot simpler.
Besides the obvious of not needing to worry about all the elements that come with video recording, audio-only frees to up to record effectively wherever you want (as long as your audio quality isn't compromised).
For example, if you bring your microphone into your closet, you’ll get almost the same audio quality as if you were renting a professional studio, but no one wants to see the inside of your closet.
But ultimately your audio quality will make or break your podcast. Period.
Audio and Video
The benefit of video and audio together is that your audience can visually connect with the content, and you can distribute your podcast in more places (e.g. YouTube). Recently, YouTube announced that it was doubling down on the podcasting space and now has a section completely devoted to podcasts.
You can adjust your settings so a certain playlist is set to “podcast” and then it will show up alongside other podcasts.
The other benefit of audio and video together is that you can create short clips for sharing on social media.
This can enable you to reach a wider audience through TikTok and YT shorts, allowing you to get in front of more people that don't know about your podcast, give content for your followers and audience to engage with, and repurpose the content you worked hard to create.
In-Person
The benefit of in-person is that it can differentiate you from a lot of the other podcasts out there. If you do in-person — and pull it off — it could be sweet. Like this one:
Of course, there’s a clear reason people choose to do virtual interviews. It’s approximately 100x easier. Once you’re in person you need to think about:
- Cameras (at least two)
- Recording space you can use for every episode
- Tripods
- Cables
- Lights
- Mics
- Stands
- Mixers
- Audio recorders
- Laptop
It’s a lot of work. But if you have the time, space, and budget to do this then it can help you look more professional. But when starting out I still recommend putting more of your effort into the prep work for the content itself since that is what your podcast will be built on.
Other tips
Regardless of which podcast format you choose, there are a few things you need to pay attention to regardless:
- Create mile markers in your show
Mile markers are moments you can replicate from episode to episode.
Think Jimmy Fallon’s Thank You notes.
Or Tara Robertson’s famous first question in Demand Gen Chat: “What’s a marketing hot take you want to share with our audience?”
Or the question Guy Raz always finishes with on How I Built This: “How much of your success can be attributed to your grit and hard work, and how much was just luck?”
It’s important to have mile markers, so people know what to expect each time — and have something to look forward to with every episode. This doesn't mean you’re locked into a strict format from the first episode, but give your audiences moments to expect so they can become familiar with your content.
- Taking the reins
I touched on this earlier, but the biggest mistake I see in new or inexperienced podcasters is giving free rein to the guests.
A good host takes control of the conversation and interrupts when necessary.
Yes, you need to listen. Yes, you need to empathize. But not so much that you become a passive listener and allow your guest to become the host.
- Design eye-catching album art
A podcast’s album art is going to be 50x50 pixels once its shrunk down into the feed, so you need to think about how to create artwork that’s recognizable.
For our podcast, Demand Gen Chat, we decided to use a bright orange as the background, so it’s immediately recognizable in someone’s podcast library.

For more info on this, this video on creating your podcast cover from Sweetfish Media is a great resource.
Step 3: Buying your equipment
Now that you’ve decided on your format and style, it’s time to buy your equipment.
For Demand Gen Chat, we decided on a virtual, interview-style podcast that includes both video and audio components. The rest of the article is going to focus on that type of podcast, in particular, since that’s what we’re working with every week.
Podcasting equipment for great audio
Good quality audio is probably the most important thing you can do for your podcast. Let me say that again, good quality audio is probably the most important thing you can do for your podcast. Even if you have the most amazing recording setup or content in the world, if the audio is scratchy or really quiet or unnaturally loud, people aren’t going to want to listen to it.
Despite this, I still see (well, hear) so many podcasts with bad audio.
Audio quality seems like an afterthought when it should really be THE thought.
The good new is that you don’t need to have a crazy setup to achieve good-quality audio. Here’s the equipment I recommended for Tara for Demand Gen Chat:
This podcast microphone is the USB-C (and cheaper) version of Shure’s professional studio microphone and has user-friendly software to help you get it sounding just right.
A few tips for your mic specifically. Before you start recording, get the mic as close to your mouth as possible without it “popping” or picking up your breathing.
Adjust the mic sensitivity (also known as gain or volume) to your specific placement.
This prevents it from being too loud and peaking (when you exceed the volume limits of the mic) or too quiet (and then need to raise up the gain in the editing), which could introduce additional unwanted background noises.
Keep adjusting until you achieve that perfect sound.
Podcasting equipment for great video
If you are doing video, you can go as crazy as you want. You can even use a professional video camera as your webcam, but I don’t always recommend that because there are a lot of cables and converters and stuff. And the more elements you add to your production setup, the more complexity and points of failure for recording more episodes in the future.
What I recommend for Tara is the Logitech Brio 4K Webcam. It has professional qualityand it an easy-to-use webcam. If you want to get a little more bougie, I have the Opal Camera and absolutely love it.
Pro tip: If you’re an iPhone/Mac user, thanks to a recent update on iOS and MacOS you can now use your iPhone camera as your webcam!
Also here’s a more detailed step-by-step guide on how to do this in Riverside.
If you decide to go the iPhone route, I recommend the Stouchi Continuity Camera Mount so you can easily attach your iPhone to your monitor
The other thing you need to think about with video is lighting.
Now can I go on a quick rant about lighting here? You don’t need a ring light.
Ring lights were designed for the fashion industry. They were created to accentuate the eyes and gives a fashion model a circular glint in their eyes.
And for some reason during the pandemic, these ring lights were chosen as the remote setup lighting of choice. Since then, they continue to be the first light people choose when upgrading their setup.
But, in my opinion, it’s the wrong tool for what most people need. It’s also extremely hard to find one that produces a natural and good quality of light. Thanks to their popularity, Amazon is overflowing with hundreds of different variations and cheap knockoffs. Please just avoid them.
Anyways, I needed to get that off my chest. Now how about I share what I recommend instead?
I will say that most people do need some additional lighting to help make them and their space look good, and I personally use and recommend the El Gato light panel.
It sits right on your desk and doesn't require bulk floor stands, it also has wifi control so you can easily turn it on and adjust the brightness and color settings right from your desktop.
This may seem obvious but windows are also a great solution to getting some more light into your setup.
If you’re sitting in front of a window, you probably don’t need anything to compensate. (But stay out of direct sunlight).


If you’re next to a window, use another light like I linked above to compensate the other side of your face.
The final thing you need to think about with video is background.
It’s not about having the perfectly curated background, you just need a background that represents you and is either visually unique or clean and minimal.
But here are a few background no-nos if you’re feeling lost:
- Don’t have a window behind you. It will silhouette your head and look awful.
- Put 5+ feet (1.5m) between yourself and the wall behind you (if you have space) it helps separate you from your background and also you can get shadows that will be really distracting if you’re too close.
- No messy bookshelf: If you have a neat, organized bookshelf that reflects you, go ahead. But if you’ve got a bunch of paperbacks haphazardly stacked on the shelves...that’s not a great look.
- No blurred or virtual backgrounds. Blurred backgrounds make its feel like you’re on a work call.
Step 4: Guest outreach and scheduling
Next step is reaching out to guests and getting your first recording session scheduled!
Tara shares her process for identifying guests in her article about how to host a B2B podcast, so I’ll get into the actual outreach and scheduling process.
She usually reaches out to people she’s already connected to via LinkedIn. If it's someone new, she sends a short and sweet message like this:

Once they say yes, she usually moves the conversation over to email to get into the details:

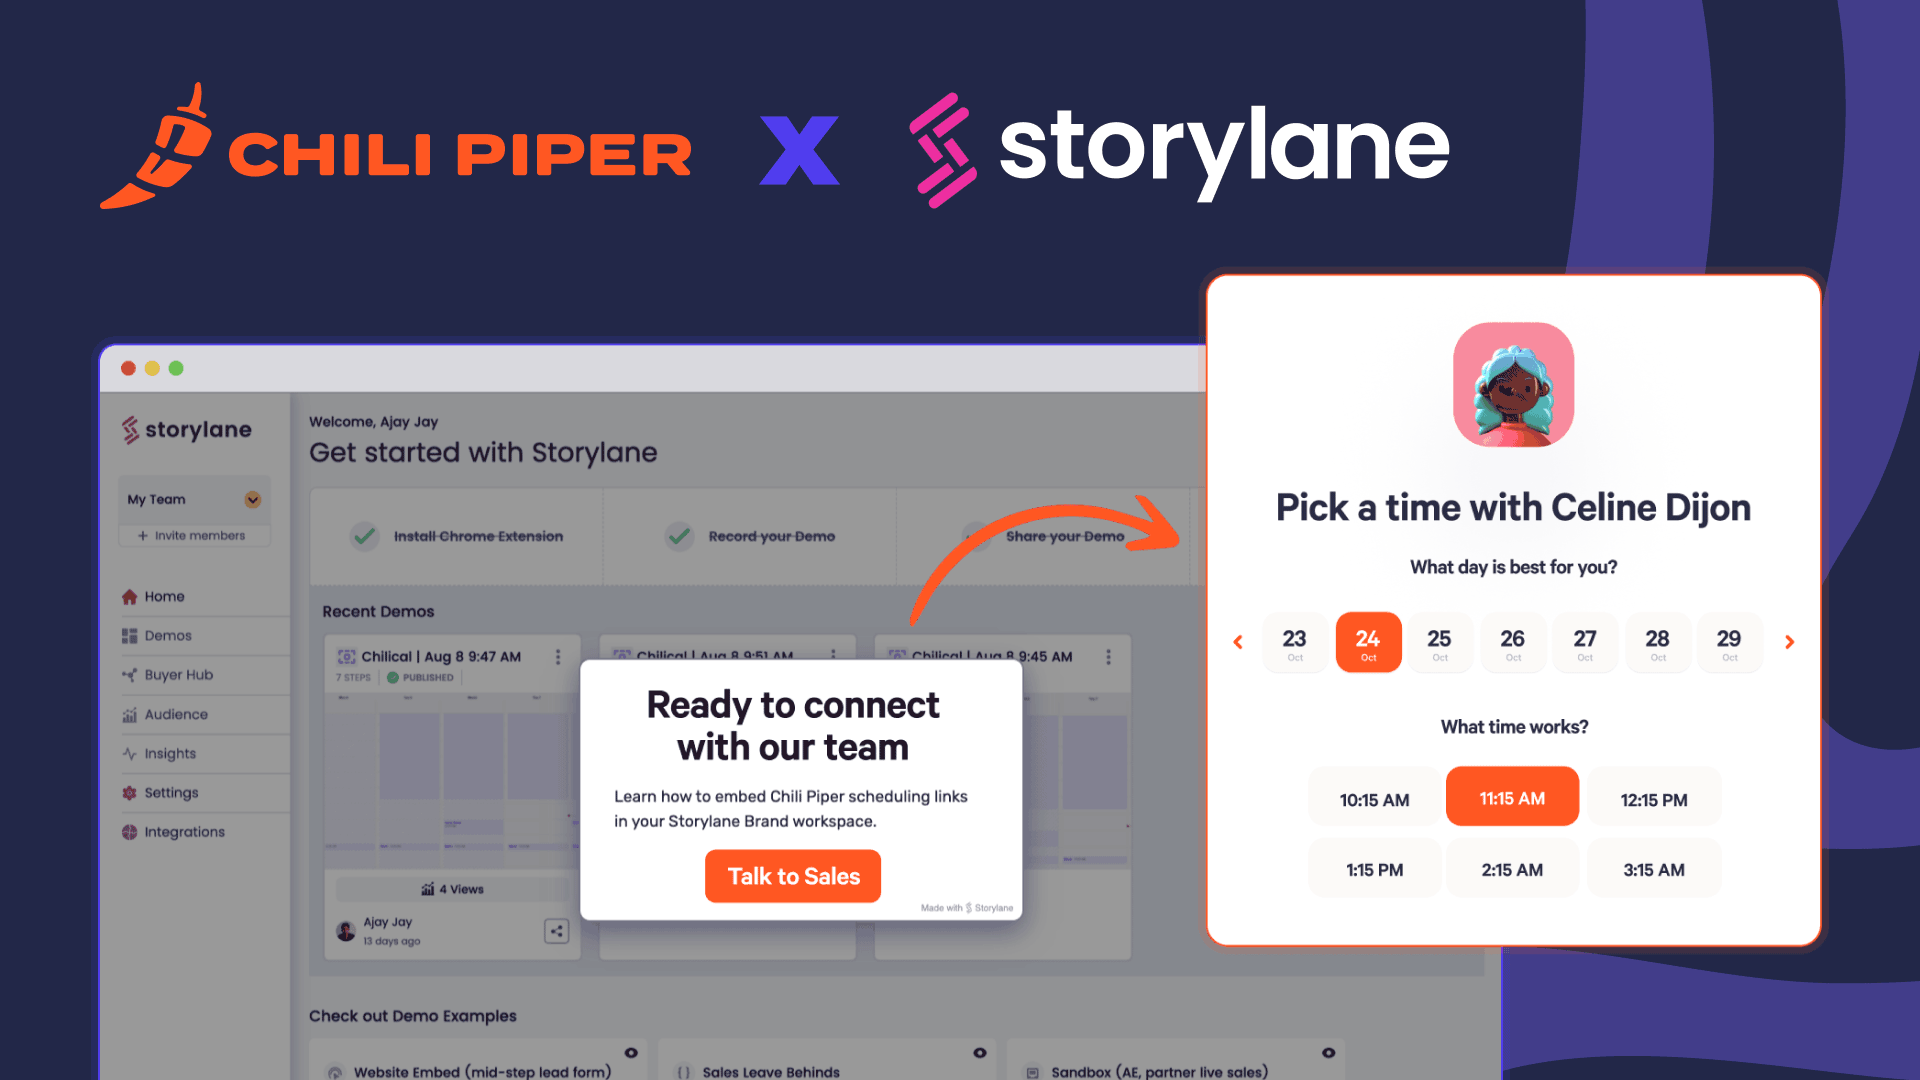
This is what her podcast guests see when they go to pick a time to record:

We use Chili Piper to schedule podcast recordings, this is helpful for a few reasons:
1. She can set specific days and times that she wants to be available to record an episode, and there’s no back and forth scheduling emails
(She’s usually speaking with people who have very busy schedules!)
She can also customize the meeting to include handy reminders for my guests to make sure they’re ready for the recording:

She’s also able to add a 15-minute buffer into both calendars in case they run over our set time
And all of the above is automated so she only had to set this up once 🙂
Step 5: Recording
Once you’ve figured out your audio and video situation, it’s time to start recording.
But please, for the love of all things good in this world, do not use Zoom.
You might ask: “Why? It records great, it’s easy to use… what’s wrong with Zoom?”
Thanks for asking the hard questions.
Zoom prioritizes a smooth video conferencing experience, not a smooth recording experience.
Also, video files are recorded as a single file, so you don’t have a lot of control. If someone coughs, the video switches over to them. If a garbage truck rolls by, you can’t mute the garbage truck.
Instead, I’d recommend a remote recording tool. We use Riverside.fm and I have so many nice things to say about them.
First, it records the host and the guest separately, so it gives you more control over audio and video. If your guest is quiet and your host is loud, you can adjust the sound settings separately.
If your guest’s AC turns on while your host is asking a question, you can work on editing it without affecting the host’s audio.
I have so many nice things to say about Riverside, that I recorded a video about it:
My last recording tip is to schedule enough buffer time at the beginning or end of the call. We record Demand Gen Chat for around 45 minutes, but book an hour of time.
At the beginning of the call we chit-chat and check the guest’s lighting and audio.
The other tip I’ll share is to start recording as soon as you hop on the call, so you can naturally transition into your questions. That helps get your guest comfortable and makes them forget that they’re being recorded.
Same with the ending. Wrap up the episode but don’t stop recording — sometimes the best soundbites can happen after the recording stops and the pressure from recording the episode is off.
Step 6: Editing
We use Descript as our editing software for all podcast video and audio editing.
What’s great about the Descript/Riverside combo is they integrate, so you don’t have to download the files. You can just export from Riverside into Descript.
I could write an entire article about how to use Descript and how to properly edit a podcast. But here are some of the biggest mistakes I see people make:
- They don’t edit at all. They upload the conversation back-to-front. That’s a great way to kill your retention rates.
- They just do a side-by-side of the host and the guest. This is not engaging when you’re trying to listen to what the guest is trying to say if the host is doing something distracting.
- Not editing your audio. Bad audio is not an excuse, especially in the age of AI. I use Descript’s Studio Sound feature to improve our audio quality and it’s magical, I would consider it worth the price of Descript alone, it’s that good. I just toggle it on and it uses AI processing to make it sound like we spend too much money on audio equipment.
- They don’t shorten the gaps of silence. Descript has a feature where I can remove word gaps up to a certain duration that I choose. Any gap that’s 1.5 seconds or longer I automatically shorten to 1 second (sometimes this saves me 3-5 minutes of time over the course of a 45 minute conversation!)
- They overly produce intros and outros. This is a personal preference, but I stand by it. The intro should promise the value that you’re going to get out of the episode. It shouldn’t be too over the top. When you transition from the intro to the actual content, it should feel natural.
- They record an intro before they’ve interviewed the person. Instead, record it right after you’ve finished the session, when you’re wearing the same clothes and the content is fresh in your mind.
- They ask for reviews instead of ratings. Writing a review is overwhelming. Instead, ask for a five-star rating. Anyone can go to your podcast, hit 5 stars and move on with their life. And if they want to write a review while they’re there, all the better.
- They make the outro too long. People smell an outro a mile away. And they’ll stop listening immediately, impacting your average percentage listened. Instead, make the transition quick and seamless.
Step 7: Distribution
You finished recording your podcast, congrats! Now it’s time to make sure people actually listen to it.
We use Captivate.fm as our podcast hosting site. In one click, it sends our podcast episodes to a bunch of different podcasting channels — including Spotify, Apple Podcasts, Stitcher, etc.
Captivate.fm also has a lot of cool features like detailed podcast episode analytics, marketing tools, and nice visual podcast player customizations, but if you want something a little more simple, I’d recommend Buzzsprout.
Other things you want to think about:
- Creating professional-looking audiograms
We use Descript for this. The best part is you can create templates, so creating a new audiogram is as easy as dropping in soundbites into your template.
Alternatively, you could use a tool like Opus. You paste in your YouTube video link and it comes back with a bunch of video clips already cut, captioned, and even adds in emojis. You may need to tweak the captions slightly but, for a one-click tool, it's a game changer.
- Get a transcript
I use Deciphr.ai, and I love it because you upload your podcast episode’s audio and then it will extract a transcript, episode summary, and timestamps, which is great for your YouTube video or podcast players that recognize timestamps (like Spotify).
You put a lot of effort into producing compelling podcast interviews, and a tool like this help your repurpose your spoken content into written content you can use on your podcast's website, blog posts, social media captions, and more!
- Upload to YouTube
And make sure you take advantage of their new podcasting features.
When you turn a YouTube playlist into a podcast, you get separate analytics and you are also grouped on their new podcast page. You also get the chance to be featured on their podcast-specific page.
- Create a landing page for each episode
Your podcast website is where you put your show notes, links, long-form blog content, and the full transcript. You should also embed the full video on that landing page. When you’re sharing your episode, this is the page you want to link out to. Here’s an example of what we create for each individual episode of Demand Gen Chat.
- Your release schedule
Think about a publishing schedule that’s sustainable, because podcasting is a long game. Is it once a month? Is it every other week? Every week? Do you do it only Q1, Q2, and Q3 and stop in Q4? (that’s what we do) Create something replicable for your audience because they will expect it.
Bonus: thank your guests for their time
We’re able to send thank-you gifts very quickly via Reachdesk:

Wrapping up
We did it! You’re well on your way to producing your first B2B podcast.
To see what happens when you combine all this knowledge, check out Demand Gen Chat! Tara interviews the best-of-the-best in marketing and shares tactical marketing advice that’s working today.
And if you want more creative marketing content or have any questions, you can connect with me on LinkedIn!
See the power of Chili Piper in action today!


marketers!
No spam, just spice

